


Installing the collar into a STAR TREK: The Original Series men's service uniform shirt (a.k.a. "tunic") is regarded by many as the "worst" part of the construction process — even more-so than the invisible zipper.
This article will examine the common issues and give a complete tutorial on the "Chase method" of creating and installing a properly-fitted TOS uniform collar, which has served the author unfailingly on his replicas.
Author's Introduction
The uniform collar's daunting reputation is partly due to the sewing skill required.
An inherent difficulty is that the collar is created to be smaller than the neck hole into which it will be installed. Unlike dress shirts and other garments that have solid collars, service shirt collars are made of stretch fabric and intended to fit snugly around the wearer's neck.
Thus, the uniform maker's tasks are to:
- Create a collar that is properly fitted to the wearer's neck measurement.
- Install the collar such that it not only forms into the classic "V" shape, but is uniformly stretched all the way around the circumference of the larger neck hole. (An unevenly stretched collar may put too much tension on some portions of the uniform fabric and not enough on others, resulting in a puckered or lopsided appearance.)
Unfortunately, an unnecessary second layer of difficulty is added by the majority of patterns that contain either vague or convoluted collar instructions, making this step more of an art than a science.
Experienced tailors develop a "feel" for collar installation, but I insist as a proponent of process and formula that even first-time builders should be able to follow step-by-step instructions that eliminate the uncertainty factor.
My method was deduced from studying the vintage pattern drafted by Bill Theiss for Lincoln Enterprises*, and so it may perhaps be the same as was used by the wardrobe department on The Original Series.
As a disclaimer: it is possible that other costumers over the years have realised it as well; however, I have never seen my particular method described or posted elsewhere. It is unlikely that anyone working with a revised version of the pattern would glean the necessary information, for reasons explained below.
*UNLESS OTHERWISE NOTED: Starfleet.ca utilises the original pattern drafted by costume designer William Ware Theiss for Majel Barrett-Roddenberry's Lincoln Enterprises in vintage size 'Large' (40). With the application of common sense, tutorials should be adaptable to any other functional rendition of the pattern, as expounded in TOS Men's Shirt - Pattern Selection.
Determining the Neck Measurement
An accurate neck measurement is required in order to customise the collar pattern piece.
WARNING: Do not skip measuring; do not assume that your uniform collar size will be the same as your dress shirt size!
Using a tailor's tape, measure around the middle of the neck where the top of the uniform collar will sit. Pull it snugly; the collar fabric will have give, whereas the tape does not.
Be certain to keep the tape flush to the neck and level to the ground (do not measure on an angle). Measurements may be rounded down to the nearest quarter-inch.
A stretch collar such as the one we are creating is intended to be the same as or slightly smaller than the wearer's neck so as to form around it snugly.
In contrast, a solid collar (such as on a dress shirt) must measure larger so as not to choke. Its sole usefulness in this process is to serve as a "sanity check": the measurement you took should be no larger than your shirt size, otherwise it is unlikely you have measured correctly.
E.G.- I wear a 15.5" dress shirt and my uniform collar (neck) measurement is 15". Experimentation has shown that using my shirt size (15.5") results in a collar that is slightly loose, and anything larger is very loose.
Another consideration is that stretch fabric inevitably loses a certain amount of elasticity over time, and sometimes dramatically so, depending upon the textile. A collar that is already a little loose on the first wearing is apt to look sloppy by the 10th wearing. Ripping out and replacing one is an utterly tedious process, and it is an unfortunate waste if a shirt becomes prematurely unwearable on account of a sagging collar — thus you should take extra care to ensure that yours initially has a good, snug fit.
N.B.- Coinciding with the recommendation to always build a muslin before cutting good uniform fabric, you should certainly install a test collar into your mock-up, but using your actual collar fabric to see if it fits the way you intend. Even a half-metre of fabric will yield numerous collars, so there should be plenty to spare.
Original Collar Pattern Piece
Before venturing to create a custom collar pattern piece, take a moment to examine the original, which is often criticised for being "too big":
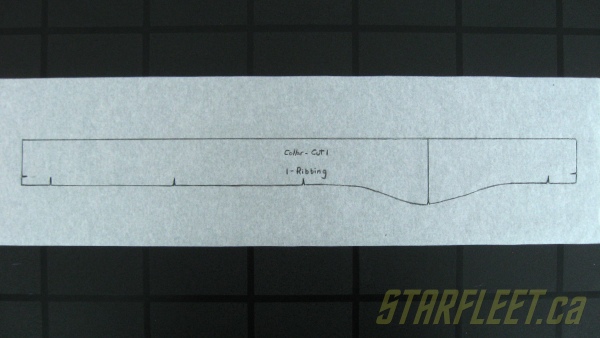
The above trace from the Lincoln Enterprises vintage size 'Large' (40) pattern creates a seventeen inch (17") collar. (Similar sizing has carried over to other patterns that are based on the original.)
That may immediately seem like a drafting error. Although it is still smaller than the neck hole, it is unlikely that anyone with a 40" chest would require a 17" collar — as has been discovered by many who attempted to simply use the piece as supplied!
However, the word "ribbing" written on the collar piece itself indicates to me that this seemingly-oversized measurement is deliberate.
Black ribbing was the first of two collar fabrics utilised on TOS, and was employed only on the earliest of the men's hero uniforms (it was supplanted with black springweave by the end of Season 1).
Thus, part of our theorised justification for the "oversized" collar piece is found in remembering that Bill Theiss did not initially conceive the black collars as being flush to the actors' necks at all.
The first black ribbed collars appearing on-screen in “The Corbomite Maneuver” [1x02] still followed an overall "turtle-neck" concept from the pilot episodes — and outside the scope of academic research, might be best forgotten about!
With the notable exception of Captain Kirk's (which was customised to sit ultra-low for William Shatner, and remained flush only due to the addition of a special drawstring), they generally stood up and away from the neck, as in these examples:


These early black collars had substantial thickness – akin to the large ribbed collars on women's uniforms – suggesting that they may have even contained buckram or another interfacing on the interior to prevent them from sagging.
The effect was unflattering, and the men's uniforms were revised with the familiar fitted collars containing hook-and-eye closures over the course of the next several episodes.
Given that the overall pattern we are studying was drafted with the quintessential Season 2 bell shape and raglan sleeve (Season 1 shirts were more "box cut" and featured a Saddle Shoulder), it is valid to question why the included collar piece would not have been similarly updated to a "correct" size.
The logical answer is that form-fitting collars would create the need for the wardrobe department to customise them to flatter the individual actors — as indeed they did, not only in size but in shape, with collars throughout TOS varying in height, and having neck hole shapes ranging from circular to ovoid.
It is well within reason that a "stock" or "master" collar piece would be adjusted in size by the correct amount to fit each cast member's measurements.
This is not unlike the advice given today, although the instruction itself is typically haphazard, such as: once stretched around the neck hole you will find you have way too much fabric; cut the excess off
.
A professional wardrobe department would presumably use a much more accurately defined process for this alteration. The next section will explain how to customise a correctly-sized collar pattern piece.
Creating a Custom Collar Piece
The instructions provided with the original LE pattern provide no guidance on resizing the collar, as reproduced here for perusal: le_pattern_instructions.gif (135 KB).
All we receive are the collar should be cut out of black fabric elasticized
and finally, attach collar
.
This doesn't initially seem very useful; however, patterns drafted for production costume shops assume a certain level of tailoring knowledge.
One cardinal rule that is strongly emphasised throughout the instructions above is how VERY IMPORTANT
it is to indicate notches on all pieces of the pattern
, and to sew the pieces together always matching notches
.
Taking another look at the original collar pattern piece, one thing immediately evident is that there are numerous notches:
The bottom (vertical) notches are what provide our critical information.
Yet, as of this writing, every subsequent commercial pattern that has provided an updated collar piece appears to have completely eliminated the notches, drafting it as a blank strip — even in cases where it was clearly traced from the original!
Regardless of the reason for this, revised patterns – for whatever improvements they brought to the table – succeeded in eliminating the intrinsic collar guidance that the original gave us.
The Formula
Measuring the distance between notches on all three original collar pieces (S,M,L) shows that regardless of the size, one quarter (25%) of the collar measurement is to the wearer's left of the front centre notch, and three quarters (75%) is to the wearer's right of the front centre notch, with a notch marked out at each quarter. Finally, one inch (1") of excess is added onto each end (to be turned under and tacked down), with two more notches marked.
The following example chart illustrates this in further detail (click for full size):

On the chart, numbers above the collar note the measurements of the original 17" collar piece, while numbers below the collar demonstrate how one would re-locate the notches to adjust it for a 16" neck*.
*N.B.- Sixteen inches (16") was selected as our example measurement simply because it easily divides into four.
To create a 16" collar:
- Divide the desired neck measurement by four, resulting in four inches (4").
- Mark one 4" segment (25%) to the wearer's left of the centre notch.
- Mark three 4" segments (75%) to the wearer's right of the centre notch.
- Mark an additional 1" excess segment (to be turned under) onto each end*.
*N.B.- Alternatively, just half an inch (0.5") of excess can be added onto each end, at one's own discretion. Both 1" and ½" measurements were employed on screen-used uniforms.
Your custom collar pattern piece is complete!
To summarise: regardless of whether your pattern includes notches or not, any size collar can be created from any existing collar by dividing the desired neck measurement by four, marking one segment (25%) left of centre, marking three segments (25% × 3 = 75%) right of centre, and adding 1" of excess onto each end.
Assuming that you have marked all notches (VERY IMPORTANT
!), each will line up with a specific location on the neck hole for correct installation. This automatically aligns the collar, evenly distributing its tension.
The Side Notches
Whereas the bottom notches are entirely useful, the side notches are generally not.
These are marked at five sixteenths (5⁄16") and indicate that the collar was originally intended to be attached with a minimal seam allowance rather than the standard ½" seam allowance.
On an academic note, this is yet another piece of evidence indicating that the included collar piece is both a "shop default" and a throwback to the ultra-high ribbed collars of early episodes, examined above.
A typical TOS collar should be installed using the standard half an inch (0.5") seam allowance, which can be observed on multiple screen-used uniforms.
In short, the original side notches can be safely ignored unless the "ultra-high" look is your intention.
Fabric Selection & Preparation
Any collar fabric must possess sufficient elasticity to stretch into the neck hole, but without so aggressive a resistance that it puckers up the uniform in an unsightly manner.
As such, deviating from those named herein is not recommended, and should only be undertaken with excellent cause and thorough testing.
Men's service shirts utilised one of two collar fabrics, both of which are commercially available:
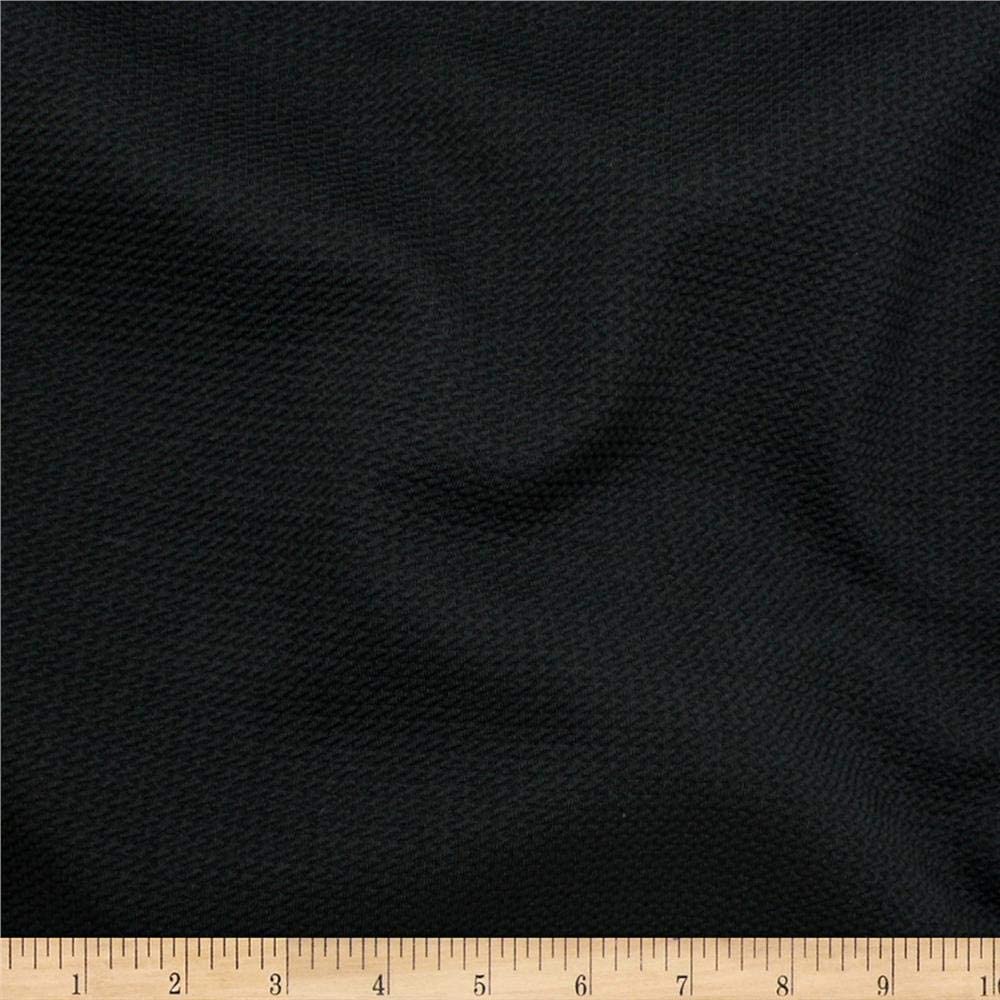
- Black ribbing (a.k.a. common rib knit) was employed in early-to-mid-Season 1.
- Springweave (a diamond weave knit) supplanted rib knit on hero* uniforms by the end of Season 1, and continued to be utilised until the end of the series.
*N.B.- A belief has been stated in various forums that rib knit continued to be used on some background shirts even into Season 3, but we have not yet seen adequate evidence to confirm it as true.
Springweave Explained
Springweave is the more screen-accurate fabric choice in most cases, boasting even better elasticity than rib knit and possessing a diamond-weave that is less "common-looking" and preferred by many aesthetically.
The following screencaps show a visible difference between rib knit in “Shore Leave” [1x17] and springweave in “Space Seed” [1x24]:


A better illumination of the springweave texture itself can been seen in this screencap from “Let That Be Your Last Battlefield” [3x15]:
Unfortunately, springweave is more difficult to work with than rib knit and has significant long-term disadvantages.
Its great elasticity is provided by numerous individual parallel rows of elastic on the reverse side of the fabric. Like any rubber band, these loosen with time and use — sometimes drastically. The weave itself is so loose that one can see light through it when stretched, and without the elastic tension, it loses all stability.
The uniform maker must be aware that albeit more accurate, shirts employing springweave collars will likely meet a quicker end to their useful lifetime due to the collar sagging, which was an issue that also affected the original production.
An Alternative to Springweave!
A third collar fabric option was discovered by the author in 2013 after an extensive search for a suitable modern alternative to springweave, and remains commercially available as of this writing!
Telio Paola Pique Knit possesses a diamond-weave surface pattern that is remarkably similar to springweave — sufficiently so that TOS uniform experts have mistook it for the authentic item, even at close range.
However, this two-layer medium-weight knit fabric derives its elasticity from a fused layer of spandex that is unlikely to deteriorate as elastics do.
Paola Pique is thus a highly practical "best of both worlds" option, strongly recommended for use on any shirts intended for repeated wear. (The author has long since relegated the original springweave to the realm of museum-quality display replicas.)
N.B.- Additional links to collar fabric sources are provided on the Links & Resources page.
Pre-Shrinking
The necessity to pre-shrink the collar fabric cannot be over-emphasised. Even synthetic textiles can experience shrinkage, although that is just one of the factors.
Any fabric on the bolt may contain starch or other finishing chemicals, and black fabrics are notorious for losing dye in their first washing. The exposure to hot and cold during cleaning may also affect the initial elasticity of a stretch fabric.
Ultimately, pre-shrinking ensures that any significant changes will occur before the collar is cut, rather than when the uniform is cleaned for the first time. Putting one metre through a standard wash/dry cycle and then gently steam pressing it will provide a small ready-to-use supply for multiple projects.
Collar Cutting
Cutting is straightforward: the collar should be cut from a strip of fabric folded in half, on-grain and on the fold, such that its length (circumference) follows the direction of greatest stretch.
You may be inclined to press a crease into the fabric to assist with aligning on the fold. This should generally be avoided. If you wish to do so, press out said crease after cutting. Collar tops should roll over smoothly where they meet the neck, not be flattened into a crease.
Once cut out, fold in half with the wrong sides together and finish the short edges (the two ends) by zig-zag stitching each one together with black thread.
N.B.- Do not sew the long raw edges at this time; they will be kept aligned manually while installing, and finished towards the end.
Shirt Preparation
At the time of collar installation, your shirt will be nearly complete.
In my own process, installing the collar is the penultimate step to attaching the Breast Insignia. (Some leave Officer Rank Insignia to the end as well, but excluding "stock" uniforms for which the final rank and/or sleeve length are unknown, there is little justification not to lay the braid while the sleeves are flat.)
Zipper Inspection
Although a tutorial on the invisible zipper is beyond the scope of this article, it should already be present and installed in one of the following two manners:
- If the stop is half an inch (0.5") from the top of your uniform fabric (at the base of the collar), the metal pull should be removed from the slider and replaced with a black pull cord to be tucked up behind the collar.
- If the stop is one quarter inch (0.25") from the top of your uniform fabric, the zipper pull itself will be pulled up behind the collar and thus hidden from view; replacing it with a pull cord is optional.
WARNING: In either case, stitching of the zipper tape must not infiltrate into the ½" seam allowance around the neck hole, or issues will arise!
Front & Back Notches
Prepare the shirt for collar installation by adding two quarter-inch (0.25") notches:
- Cut a notch at the centre front of the neck hole (at the very bottom point of the 'V'). This is not only for alignment, but facilitates a crisper point on the "V"-shape by allowing the seam allowance to spread open while sewing.
- Cut or mark a notch at the centre back of the neck hole (precisely where the fold was when you cut your back pattern piece). This notch is for alignment purposes only.
WARNING: When cutting any notches, take care to ensure that you do not clip beyond the needed amount!
Collar Installation
It's time to begin pinning and sewing! However, it is a classic mistake to believe that the collar needs to be pinned "all around".
The only points at which the collar will be pinned are at each of the five notches, which must align to the proper points on the neck hole. Any additional pinning would in fact be a detriment.
Moreover, using actual pins is optional. The author's own "pinning" is accomplished simply by holding the layers of fabric tightly together by hand at each subsequent set of notches while sewing around the neck hole — without a single physical pin being put into the collar at any point in time!
Notch Alignments
Verify five notches on the neck hole the following diagram:

- Notches 'A' and 'D' are the centre front and back notches added in the previous section.
- Notch 'C' is the seam line where the right front shoulder is sewn to the right sleeve.
- Notches 'B' and 'E' are on either side of the "faux seam" formed by the invisible zipper. Each is half an inch (0.5") from the end of the uniform fabric, in line with the zipper teeth — not right at the end of the fabric.
Corresponding collar notch alignments are as follows:

Sewing Instructions
Referring to the letter codes on the diagrams above, sew the collar using a standard half an inch (0.5") seam allowance, as follows:
- Align notches 'A'; drop the needle and presser foot. Beginning precisely at the bottom of the "V-neck" ensures a crisp centred point, which is difficult to achieve if sewing the collar in a single pass around the neck hole from one end to the other.
- Align notches 'B'; pin and/or hold firmly together. (Note that with 1" of excess collar fabric, it will extend ½" beyond the uniform fabric, whereas if you opted for half an inch of excess collar fabric, the end of the collar will align with the end of the uniform fabric.)
- Grasp the fabric at notches 'B'; pull gently towards you until the collar stretches out to the same length as the neck hole from 'A' to 'B', and their raw edges align.
- Ensuring the fabric remains pulled taut and that notches 'B' remain aligned at all times: sew a few stitches towards notches 'B', backstitch precisely over-top to secure, then sew from notches 'A' through notches 'B' to the end of the uniform fabric, and backstitch again to secure.
- With the uniform turned around to sew in the other direction, return to notches 'A'; drop the needle and presser foot precisely where you began (at the bottom point of the 'V').
- Align notches 'C'; pin and/or hold firmly together.
- Grasp the fabric at notches 'C'; pull gently towards you until the collar stretches out to the same length as the neck hole from 'A' to 'C', and their raw edges align.
- Ensuring the fabric remains pulled taut and that notches 'C' remain aligned at all times: sew a few stitches towards notches 'C', backstitch precisely over-top to secure, then sew from notches 'A' to notches 'C'. Backstitch 2 or 3 stitches to secure*.
- Align notches 'D'; pin and/or hold firmly together.
- Grasp the fabric at notches 'D'; pull gently towards you until the collar stretches out to the same length as the neck hole from 'C' to 'D', and their raw edges align.
- Ensuring the fabric remains pulled taut and that notches 'D' remain aligned at all times: sew from notches 'C' to notches 'D'. Backstitch 2 or 3 stitches to secure*.
- Align notches 'E'; pin and/or hold firmly together. (As with notches 'B' at the other end, 1" of excess collar fabric will extend ½" beyond the uniform fabric, whereas if you opted for half an inch of excess collar fabric, the end of the collar will align with the end of the uniform fabric.)
- Grasp the fabric at notches 'E'; pull gently towards you until the collar stretches out to the same length as the neck hole from 'D' to 'E', and their raw edges align.
- Ensuring the fabric remains pulled taut and that notches 'E' remain aligned at all times: sew from notches 'D' through notches 'E' to the end of the uniform fabric, and backstitch again to secure.
*N.B.- Backstitching when arriving at notches 'C' and 'D' is a safeguard that ensures you will not need to rip more than a quarter of the collar stitching if something should go awry while installing it.
In a nutshell, the notches ensured that one quarter of the collar was distributed to each quarter of the neck hole, and pulling the fabrics taut to equalise them in length between each set of notches automatically created the even distribution of collar tension that was being sought!
Tacking & Finishing
Put on the shirt to check collar fit.
If you are satisfied with the size and shape, finish the collar as follows:
- Turn the ends under by folding at notches 'B' and 'E', which also turns one seam allowance (½") of uniform fabric to the inside at each end.
- Tack each end of the collar down to itself using a needle and black thread.
- Hand sew hooks and eyes for collar closure. Two is the standard number (although three were observed on Captain Kirk's ultra-wide rib knit collar from early Season 1).
- Finish the raw edges of the collar and the neck hole all in one pass, by sewing a continuous line of zig-zag stitching through all three layers. (Likely due to the tendency of the collar fabrics to fray, this has been widely observed on screen-used shirts, despite that their seam allowances tended to remain unfinished in general.)
Your collar is complete!
Post-Installation Tightening
If an installed collar seems slightly loose, the first and fastest fix is to turn the ends under on a slight downward angle instead of straight over. In this way, you can easily remove at least half an inch (0.5") of circumference from the top of the collar and have it escape notice.
While any questions of initial collar sizing should have been addressed in the mock-up, this tightening technique can also prove useful if your collar gradually loosens after repeated wearing; simply rip out the first set of tacking stitches, re-tack on an angle, and relocate the hooks & eyes accordingly.
Further Reading
The following pages on the Star Trek Prop, Costume & Auction Authority are recommended for close-up examination of collar construction on various screen-used "TOS tunics":
- Early 1st Season Captain Kirk Tunic
- 1st Season Captain Kirk Tunic
- 1st Season Captain Kirk Tunic from "Operation: Annihilate!"
- Finnegan Silver Tunic from "Shore Leave"
- 2nd Season Mr Scott Tunic
- 3rd Season Command Tunic
- 3rd Season Engineering Tunic
Acknowledgements
- Star Trek: TOS screencaps from TrekCore.
- Photos of screen-used originals and other material at Star Trek Prop, Costume & Auction Authority.