

This article explains and gives a practical tutorial on the saddle shoulder: a defining Season 1 feature of men's uniforms on STAR TREK: The Original Series.
Knowing how to execute a saddle shoulder is essential for replicating the look of a TOS Season 1 service uniform shirt (a.k.a. "tunic"), as well as any of the uniform variants that were based upon it: including Captain Kirk's Season 1 wraparound and early versions of Dr McCoy's short sleeve shirts.
History & Evolution
Thinking of the quintessential TOS uniform brings to mind raglan sleeves and bell-shaped bodies; however, those features did not fully evolve as standards until Season 2.
After the STAR TREK pilot episodes, costume designer William Ware Theiss abandoned the "Cage"-style shirts, featuring standard shoulder seams and set-in sleeves. By the start of TOS Season 1, his completely revised and now-legendary 5-piece pattern provided officers with their standard service uniform shirts.
Nonetheless – even putting aside customisations for individual actors – the overall design continued to evolve throughout the series, with several notable "tweaks" to cut and style being implemented for each new season.
TOS Season 1 & 2 uniforms were both constructed of velour fabric and are thus frequently spoken of in the same breath, yet the Season 1 style is generally perceived as looking the most "masculine" or "militaristic". Typically the reason given is that they were tailored to have a shorter and tighter fit than in subsequent seasons — and that is certainly a contributing factor.
However, there is a greater design reason for this effect: Season 1 shirts were squarer!
These early drafts used what can best be classified as a saddle shoulder — not a raglan sleeve. Additionally, the body was more "box cut" than bell cut (to be examined in a separate article to follow).
From on-screen evidence examined in more detail below, it is the author's belief that both design features were revised in the time between seasons.
Saddle Shoulder vs. Raglan Sleeve
From a pattern standpoint, saddle shoulders and raglan sleeves are similar in both look and construction.
As opposed to common set-in sleeves that terminate at the shoulder, both use a pattern piece that continues over the shoulder up to the neck: encompassing a portion of the collar, and creating two shoulder seams (front and back) per arm.
In terms of The Original Series, replacing the set-in sleeves of the pilot uniforms with saddle shoulders for TOS Season 1 represented a much larger evolution in design than the subsequent revision to raglan sleeves for Season 2.
Raglan Sleeve
Raglan sleeves are commonly found in t-shirts and sweatshirts, as in this retail example:

As defined in Wikipedia:
A raglan sleeve is a type of sleeve whose distinguishing characteristic is to extend in one piece fully to the collar, leaving a diagonal seam from underarm to collarbone giving the garment a relatively undefined look.
Bill Theiss was clearly a fan of unstructured design for Starfleet uniforms, so it is not surprising that the raglan sleeve ultimately factored into the "quintessential" TOS shirt pattern.
Saddle Shoulder
A saddle shoulder differs from a raglan sleeve in the shape of its seam, descending from the collarbone as a two-line corner rather than a single diagonal line.
Although most commonly found in knitted sweaters, this retail photo of a polo shirt shows a saddle shoulder design in excellent contrast:
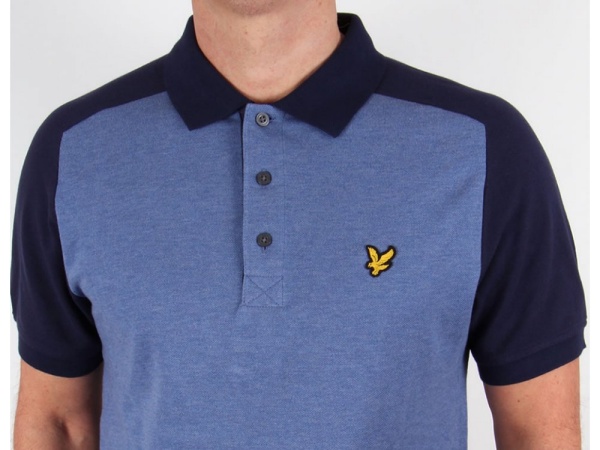
Choosing to use a saddle shoulder versus a raglan sleeve directly affects a viewer's perception of how "square" or "sloped" the wearer's shoulders are.
Examples & Comparisons
With the above in mind, herein are examples and comparisons of actual Starfleet uniforms.
Note that while "purist" saddle shoulders and raglan sleeves are drawn exclusively with straight lines, all shoulder seams of TOS service shirts are drawn on a curve. (An utterly straight shoulder seam is one indicator of a substandard replica.)
It further appears from the on-screen evidence that saddle shoulders and raglan sleeves can be cleanly separated into Season 1 and Season 2 design categories, respectively.
TOS Season 1
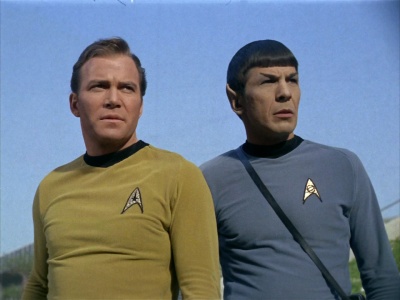
The saddle shoulder was omni-present through to the last episode of season 1, as shown in the following screencaps from “Errand of Mercy” [1x27], “The City on the Edge of Forever” [1x28], and “Operation -- Annihilate!” [1x29], respectively:


As of June 2017, modern photographs of Captain Kirk's shirt from the final episode can be examined in detail on the Star Trek Prop, Costume & Auction Authority*:
*N.B.- Of particular interest are side-facing shots, showing the front and back shoulder seams running parallel to one another for a ways — whereas with a raglan sleeve, they begin diverging almost immediately from the collar.
Also on the Prop Authority are three additional photo studies of interest:
- Early 1st Season Captain Kirk Tunic
- 1st Season Captain Kirk Tunic
- Finnegan Silver Tunic from "Shore Leave"
For general episode study, troves of photos are already available to fans in the Season 1 Blu-ray Screencaps gallery on TrekCore, hence only a few selected examples are reproduced here.
However – even keeping within the saddle shoulder format – two things are quickly gleaned:
- There was no "universally correct" number of degrees for the shoulder slope, with some being made higher than others.
- There was also variance in the corner radius, meaning that some shoulders had a larger/rounder corner and others had a smaller/squarer corner.
Instructions allowing for customisation of both design features are included in the tutorial below.
TOS Season 2
Uniforms made for William Shatner were often the first to receive design improvements, and these are no exception.
In the first episode filmed for Season 2, Captain Kirk led the design curve with new raglan-sleeved shirts, as seen in “Catspaw” [2x01]:


Proceeding onwards, Season 1 uniforms were phased out.
However, existing uniforms were by no means scrapped simply because of the design change, and continued to make various appearances throughout Season 2 (after which all velour uniforms were retired in favour of new nylon double-knit fabric for Season 3).
It is thus not inaccurate for saddle shoulders to appear in Season 2, although they no longer represented the current Starfleet design.
With the exception of Captain Kirk, the "chain-of-command" did not seem to factor into the replacement process. Especially for reasons of time and cost, the order of creating new uniforms was likely determined by the order in which older costumes wore out.
From stock, several shirts that were modified for guest stars also retained the saddle shoulder design, including Commodore Matt Decker's in “The Doomsday Machine” [2x06] and the first of two worn by Captain Ronald Tracey in “The Omega Glory” [2x25].
Alternative Uniform Variants
Phase-out did not apply to Captain Kirk's green wraparounds, as the Season 2 variant was an entirely new design. (See: TOS Wraparound Reference)
However, other alternative uniforms based on the standard pattern were replaced as needed.
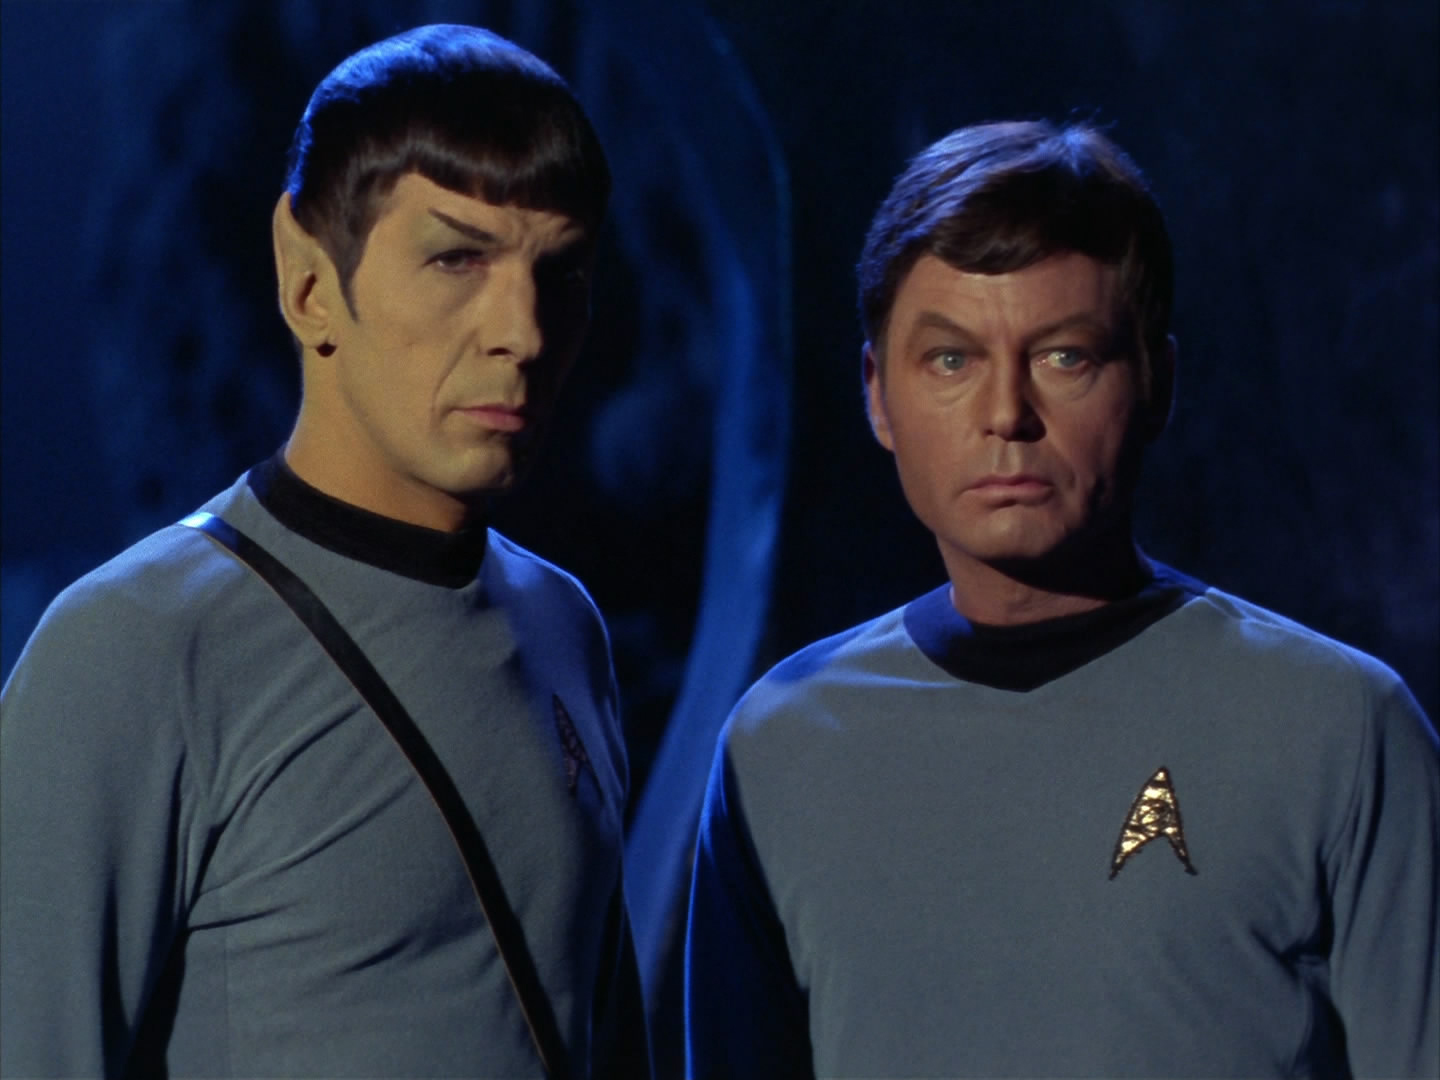
The following screencap from “Amok Time” [2x05] shows Kirk and Spock wearing new hero uniforms alongside Dr McCoy, whose short sleeve shirt has not yet been replaced:

Predictably, it evolved by the end of the season, as confirmed in screencaps from “Assignment: Earth” [2x26]:


Terran Empire (Mirror Universe)
While the author generally advises using raglan sleeves for any Season 2 replicas, the opposite advice is given for the Mirror Universe specifically.
In “Mirror, Mirror” [2x10], multiple Season 1 United Federation of Planets Starfleet shirts were re-purposed with new insignia for Terran Empire Starfleet:

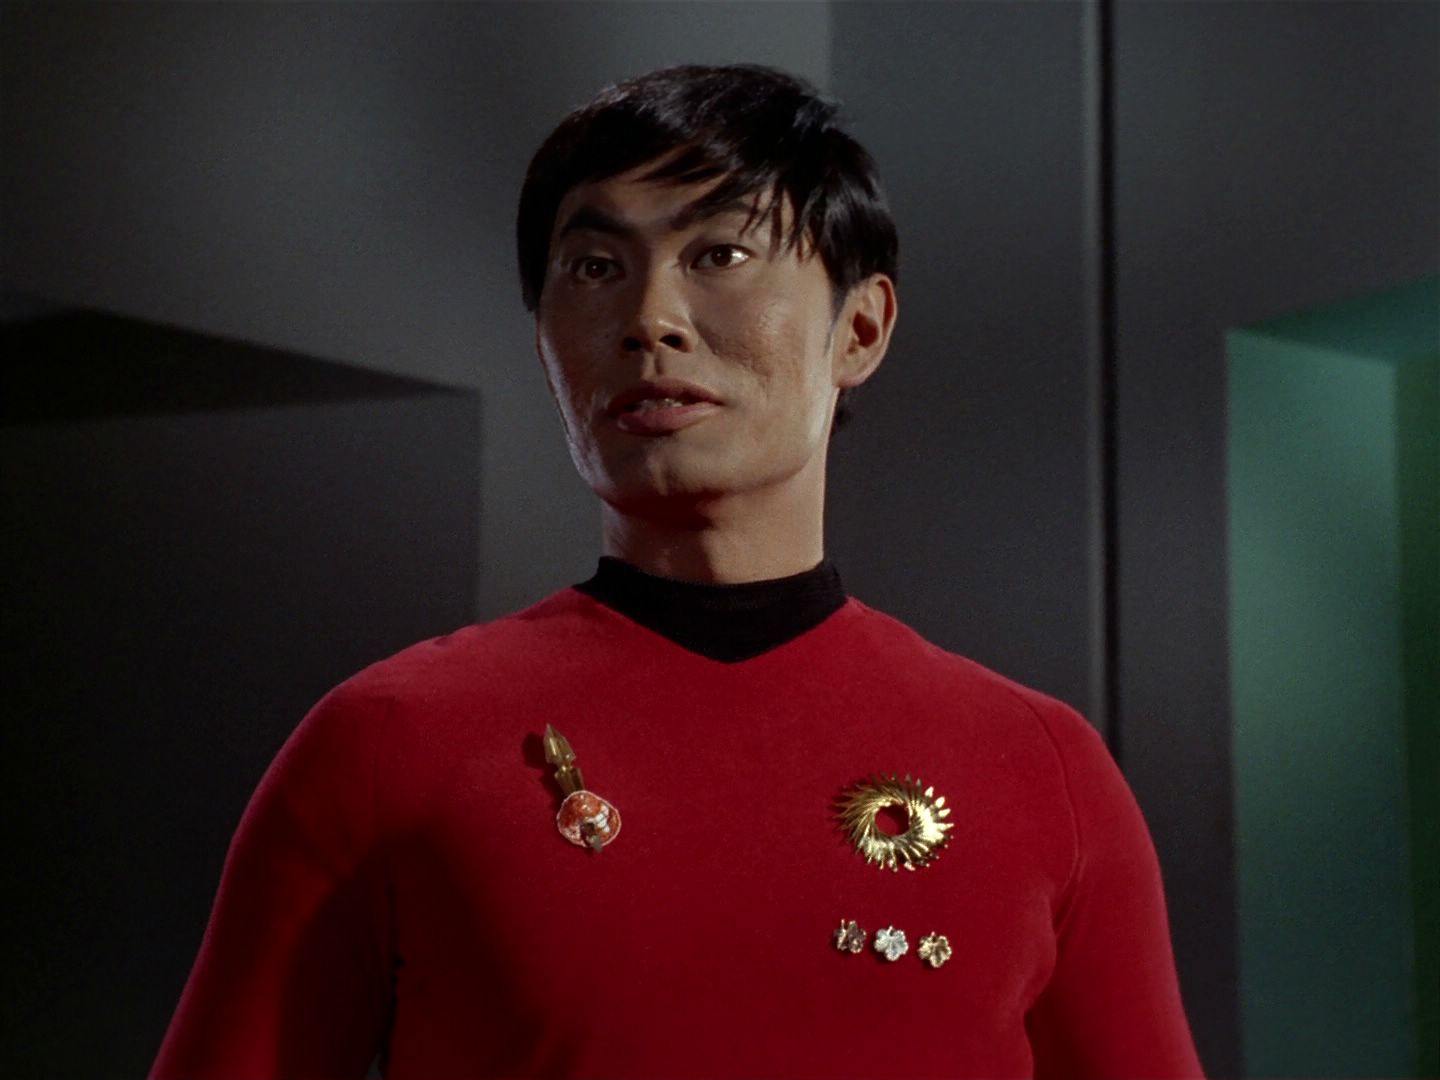
Although the reason was likely a simple re-use of on-hand uniforms as in other episodes, the squarer form loaned itself well to the more militaristic motif of the Empire.
There is furthermore a case to say that uniform design in the Mirror Universe doesn't evolve on par with the Prime Universe — starship design certainly didn't, as the I.S.S. Enterprise still retained a nacelle configuration from the "Cage/WNMHGB"-era!
Drafting the Saddle Shoulder
Drafting the saddle shoulder requires adjustments to two pattern pieces: the front and the sleeve.
UNLESS OTHERWISE NOTED: Starfleet.ca utilises the original pattern drafted by costume designer William Ware Theiss for Majel Barrett-Roddenberry's Lincoln Enterprises in vintage size 'Large' (40). With the application of common sense, tutorials should be adaptable to any other functional rendition of the pattern, as expounded in TOS Men's Shirt - Pattern Selection.
Front Adjustment
Refer to the following diagram for the instructions below:

- Mark point FP1 two inches (2") down the existing shoulder line.
N.B.- This easy method simply "squares off" the steep downward slope of the original line. For precise control over the shoulder slope, an alternative mathematical method for setting point FP1 is given below. - Beginning at the upper tip where the shoulder line meets the neck line, draw a line that intersects point FP1 and goes beyond the edge of your pattern piece. (See: Diagonal Green Line)
- Using a grading rule, draw a parallel line half an inch (0.5") inside the previous line. (See: Diagonal Red Line) This should begin at (and automatically align with) notch FN1.
- Using a square, draw a line that begins at notch FN3 and is parallel to the grain & fold lines. (See: Vertical Green Line)
- Using a grading rule, draw another parallel line half an inch (0.5") inside the previous line. (See: Vertical Red Line)
- Using a circular object, round out the corners where each pair of vertical & diagonal lines meet.
N.B.- For corner radius, a 925g coffee tin (3" radius) was used in the example diagram and produces a larger/rounder corner; for a smaller/squarer corner, a standard protractor (2" radius) works well. - Mark point FP2 on the inner vertical line, half an inch (0.5") from notch FN3. This will be necessary as a reference point while making corresponding adjustments to the sleeve.
Your front pattern piece is complete!
The inner line through the curve (See: Red Line) is the new seam line. The outer line through the curve (See: Green Line) is the pattern's new cutting line, including seam allowance.
WARNING: If you further customise the above steps, do not make any modifications lower than notch FN3! It is congruous with the top of the side panel. Any modifications made below this notch would necessitate corresponding modifications to the side panel as well.
Shoulder Slope (Mathematical Method)
As an alternative to Step 1 above, precise control over the angle of the shoulder slope can be achieved using the mathematical method.
Simply draw a line perpendicular to the grain-line that intersects the top of the front pattern piece, and place the origin of a protractor on the vertex, as shown in the following image:
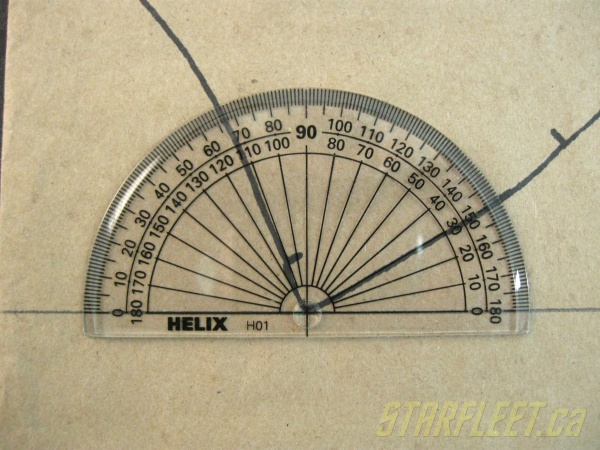
Select the desired shoulder slope by marking point FP1 on the protractor:
- Thirty degrees (30°), as measured here, is the result of using the easy method and following the line on the original pattern piece.
- Twenty-five degrees (25°) produces a higher shoulder, and is a default commonly found in shirt patterns.
- Twenty-two degrees (22°) is an even squarer measurement often mentioned by coat-makers.
Although this replaces Step 1 above, all subsequent steps remain the same.
WARNING: For aesthetic reasons, the "maximum height" should be regarded as achieved when the front and back shoulder seams have been made perfectly parallel. Beyond this, the seams will begin running towards each other, producing an odd effect when viewed from the side.
Sleeve Adjustment
Having adjusted the front, corresponding adjustments must now be made to the sleeve.
Refer to the following diagram for the instructions below:

With tracing paper, you can use the following 3-step shortcut to easily complete the sleeve:
- On your new front pattern piece, make a trace of the inner line (red line FN1-FP2)
- Transfer the line to the sleeve pattern piece: align FN1 with SN1 and place FP2 half an inch (0.5") inside the seam allowance from SN3, such that your traced line is located in the same place as the red line on the diagram above.
- Add half an inch (0.5") seam allowance to produce your new cutting line, as per the green line on the diagram above.
Otherwise, the following are the mathematical steps necessary to modify the sleeve pattern piece:
- Centring on notch SN3, draw a small curve that remains half an inch (0.5") inside the cutting line and is at least one inch (1") in length. (See: Light Blue Curve SC1)
- On the front pattern piece: measure a straight line from point FP2 to notch FN1, and record the measurement of FP2-FN1. (In the case of the example it was 8 and 5⁄16".)
- Draw a line of the same length as the measurement you took for FP2-FN1, beginning at notch SN1 and terminating on curve SC1. (See: Dark Blue Line)
- Mark point SP1 where the line terminates on curve SC1.
- On the front pattern piece: measure the inner vertical line beginning at point FP2 and ending where it is intersected by the inner diagonal line. (In the case of the example it was 3 and 3⁄8".)
- Using a compass set to the measurement you just took, centre it on point SP1 and draw a partial circle within the sleeve pattern piece. (See: Light Blue Curve SC2)
- On the front pattern piece: measure the inner diagonal line beginning at point FN1 and ending where it is intersected by the inner vertical line. (In the case of the example it was 6 and 1⁄16".)
- Draw a line of the same measurement beginning at notch SN1 and terminating on curve SC2. (See: Red Line SN1-SC2)
- Draw a line beginning at point SP1 and terminating at the same point on curve SC2. (See: Red Line SP1-SC2)
- Using a grading rule, draw two parallel lines half an inch (0.5") outside the lines you drew in the previous step. (See: Green Lines)
- Using the same circular object as you used for the front pattern piece, round out the corners where each pair of lines meet.
Your sleeve pattern piece is complete!
The inner line through the curve (See: Red Line) is the new seam line. The outer line through the curve (See: Green Line) is the pattern's new cutting line, including seam allowance.
N.B.- You may see that a trivial "bump" has formed in the cutting line where the green line meets the original black line next to SN3. This artefact can simply be trued when cutting.
WARNING: If you further customise the above steps, do not make any modifications lower than notch SN3! It is where the sleeve ceases connecting to the front and begins connecting to the side panel. Any modifications made below this notch would necessitate corresponding modifications to the side panel.
Sewing the Saddle Shoulder
While indispensable to creating an authentic Season 1 look, implementing the saddle shoulder increases the difficulty of assembly:
- RIGHT SHOULDER -
- Sewing the opposing curves of the front and sleeve together into a smooth rounded corner requires more sewing skill than the gently-curved downward slope of the raglan sleeve.
- LEFT SHOULDER -
- Sewing the individual halves of the zipper around the tighter corners is marginally more difficult.
The actual process for sewing a saddle shoulder is identical to a raglan sleeve.
As per standard sewing techniques, clipping a series of notches into the seam allowance around the opposing curves of the right shoulder will ease the task of aligning and sewing the front and sleeve pieces together.
WARNING #1: Use extreme care when clipping to ensure you do not cut beyond the seam allowance — quarter inch (0.25") notches should suffice.
WARNING #2: A clip in the centre of the sleeve curve (right in the "corner" of the shoulder) will obviously be the most helpful, but is also the most precarious. The seam line of the completed shoulder should be a smooth rounded corner, resembling the lines on the diagram. If excessive tension on the fabric pulls the centre clip too wide open while sewing, the corner of the shoulder seam will instead form a small sharp point, marring its appearance. Use several adjacent notches to distribute the stresses evenly.
1960s Versus Today
On a historical note, the metal invisible zippers of the 1960s were substantially heavier than modern plastic ones, and often tended to cause obvious puckering around the "corner" of the shoulder seam.
Examples of this can be seen on Captain Kirk's service shirt and Dr McCoy's short sleeve shirt in the following screencaps from “Operation -- Annihilate!” [1x29]:


More than likely, these practical issues were catalysts for the pattern revisions that saw the raglan sleeve emerge as a new standard for Season 2!
Nonetheless, the saddle shoulder is entrenched in STAR TREK history as a key feature of the visual style in many highly-regarded early episodes of The Original Series.
Further Reading
A companion article covering the Season 1 "box cut" adjustments for the body is being authored. Those seeking to build a fully authentic Season 1 replica are advised to delay pattern cutting until after its release.
Rank braid configurations also evolved over the course of the series; several nuances unique to Season 1 are expounded in: Officer Rank Insignia.
Acknowledgements
- Star Trek: TOS screencaps from TrekCore.
- Photos of screen-used originals and other material at Star Trek Prop, Costume & Auction Authority.